Where to Find All Ghosts in Little Nightmares 3 Chapter 4
Let’s face it – Chapter 4: Institute in Little Nightmares 3 is creepy as all get-out, but it’s also packed with secrets that’ll make you feel like a proper sleuth. Among the dolls you’ll snag in every level, this chapter throws in a secondary collectible: ghosts. Yep, six spooky apparitions that’ll only show their faces when you get close, then vanish into thin air. Snagging every one of them unlocks the ‘Institutionalized’ achievement, so if you’re a completionist like me, you’ll want to track ’em down.
I’ve combed through every dusty corner of this institute more times than I care to admit, and I’ve got the full lowdown on where each ghost hides. The good news? They’re spread out pretty nicely from the moment you wash up on that gloomy shore right until the final showdown with the boss. So grab your flashlight, keep your wits about you, and let’s hunt some ghosts – 2026 style.
The Full Ghost Hunting Breakdown
Before we dive in, a quick heads-up: ghosts are invisible until you’re practically on top of them. Shine your flashlight around suspicious spots and listen for that subtle audio cue. Once you’ve “collected” one (it fades away), you’ll hear a little ding in your soul – trust me, it’s satisfying. Below is the step-by-step list of all six ghosts, where to find them, and a couple of screenshots I managed to grab (or wish I had).
Ghost #1 – The Sandy Secret
Location: Right as the chapter begins, Low and Alone are chilling on the beach. Don’t waltz into the institute just yet. Slide over to the far right side of the screen, past that massive staircase. Shine your flashlight on the other side of the stairs and you’ll spot the first ghost – it’s drawing in the sand like some kind of eerie beach artist. Seeing it vanish will kick off your collection with a spooky start.
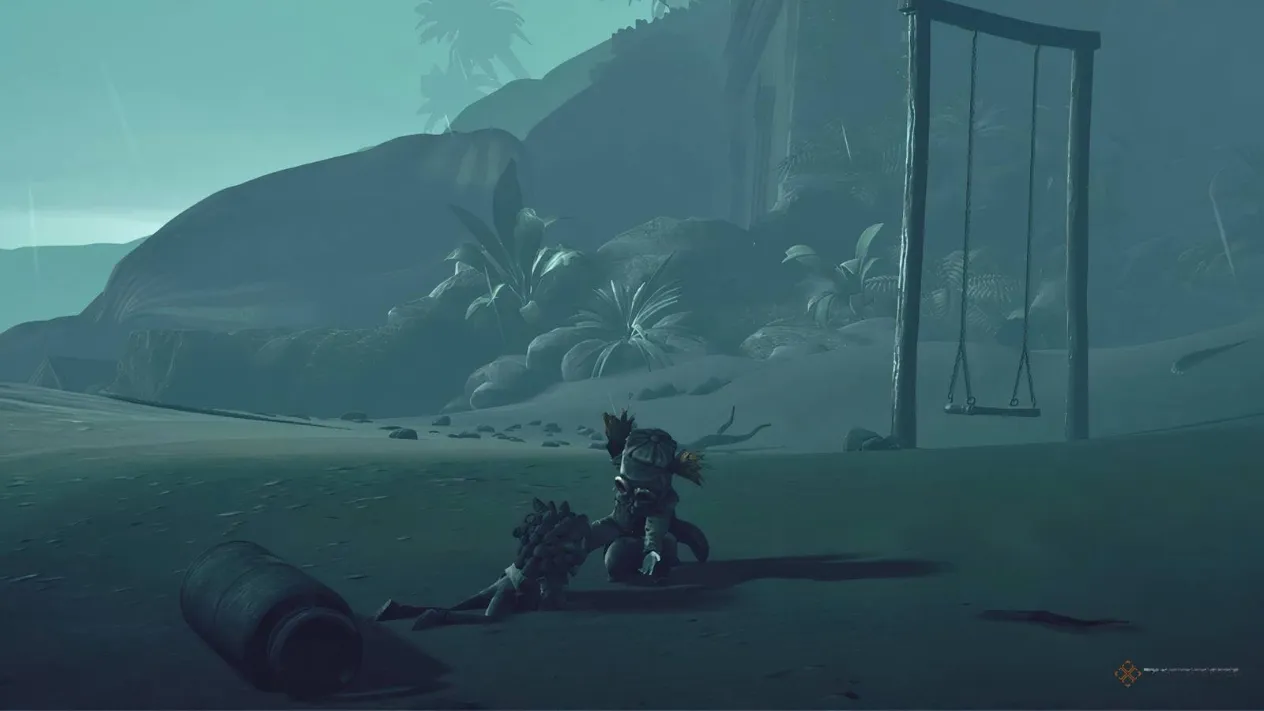
Ghost #2 – The Plant Crossing Pal
Location: After you get introduced to those man-eating plants (don’t you just love them?), you’ll hit a gap you need to cross. Alone triggers the plant on the left wall, Low shoots it, and you both scramble over. The intended path leads left up a staircase, but before you follow that, check the right corner. There’s the second ghost, drawing a sun on the wall like it’s hoping for brighter days. It’s easy to miss if you’re rushing – I know I did the first time.
Ghost #3 – The Gong Room Wanderer
Location: As you creep further in, you’ll reach a hallway with a big ol’ gong. Alone needs to smack it with her wrench (so satisfying). That action yanks a giant foot out of the wall on the left, revealing a hole. Head left through that opening and go all the way to the back left corner. There’s a bench with some luggage – and the third ghost is just sitting there, kicking its feet like it’s waiting for a bus. Don’t blink; it’ll disappear soon.
Ghost #4 – After the Chase
Location: The first chase sequence is pure panic – that creepy hand with an eye will make you jump out of your skin. Once you survive and drop into a new area, you’ll pass through what looks like mushrooms and land at the bottom of a towering staircase. Before you even think about climbing up, head to the back left corner near a coat rack. The fourth ghost is just standing there on the floor, probably as tired as you are. Grab it and take a breather.
Ghost #5 – The Lever Lurk
Location: After the boss chases you for the second time, you’ll end up in a hall where Low has to hold a lever to open a door for Alone. She goes inside, breaks a wall so they can both advance. Once that’s done, the main path goes right – but before you leave the room where Alone smashed the wall, sneak into the back right corner. The fifth ghost is chilling on a bench along that wall. I nearly bolted past it on my first run, so don’t make my mistake.
Ghost #6 – The Basement Goodbye
Location: After a long, nerve-wracking elevator ride down to a concrete basement, you’ll step out and need to cross a wooden plank. On the other side is a locked door with the last ghost inside – it’s lying on the floor near the bed. To snag the key, backtrack over the plank toward the elevator. Keep an eye on the right wall; there’s a hole you can pass through. The key is on a box in that little room. Once you unlock the door, the ghost bids you farewell and the achievement pops.
With all six ghosts under your belt, the ‘Institutionalized’ achievement is yours. If you were just replaying this chapter for the ghosts, you can bounce back to the chapter select screen and pat yourself on the back. If this is your first playthrough, you’ve got the final boss to contend with – and believe me, it’s a doozy. Good luck out there, fellow Little Nightmares nut. Keep that flashlight charged and your courage higher!
For gamers who love exploring eerie worlds like Little Nightmares but also want to keep their gaming budget in check, finding affordable options is key. Whether you’re diving into atmospheric adventures or trying your hand at other indie titles, there’s no need to pay full price for your next digital journey.
If you’re looking for the cheapest steam keys, DealNest is a great place to start. Their platform offers a wide selection of games at competitive prices, making it easier to expand your library without breaking the bank. Check it out to prepare for your next haunting adventure!